Running OpenClaw with LM Studio: A Secure, Local, and Cost-Effective AI Setup
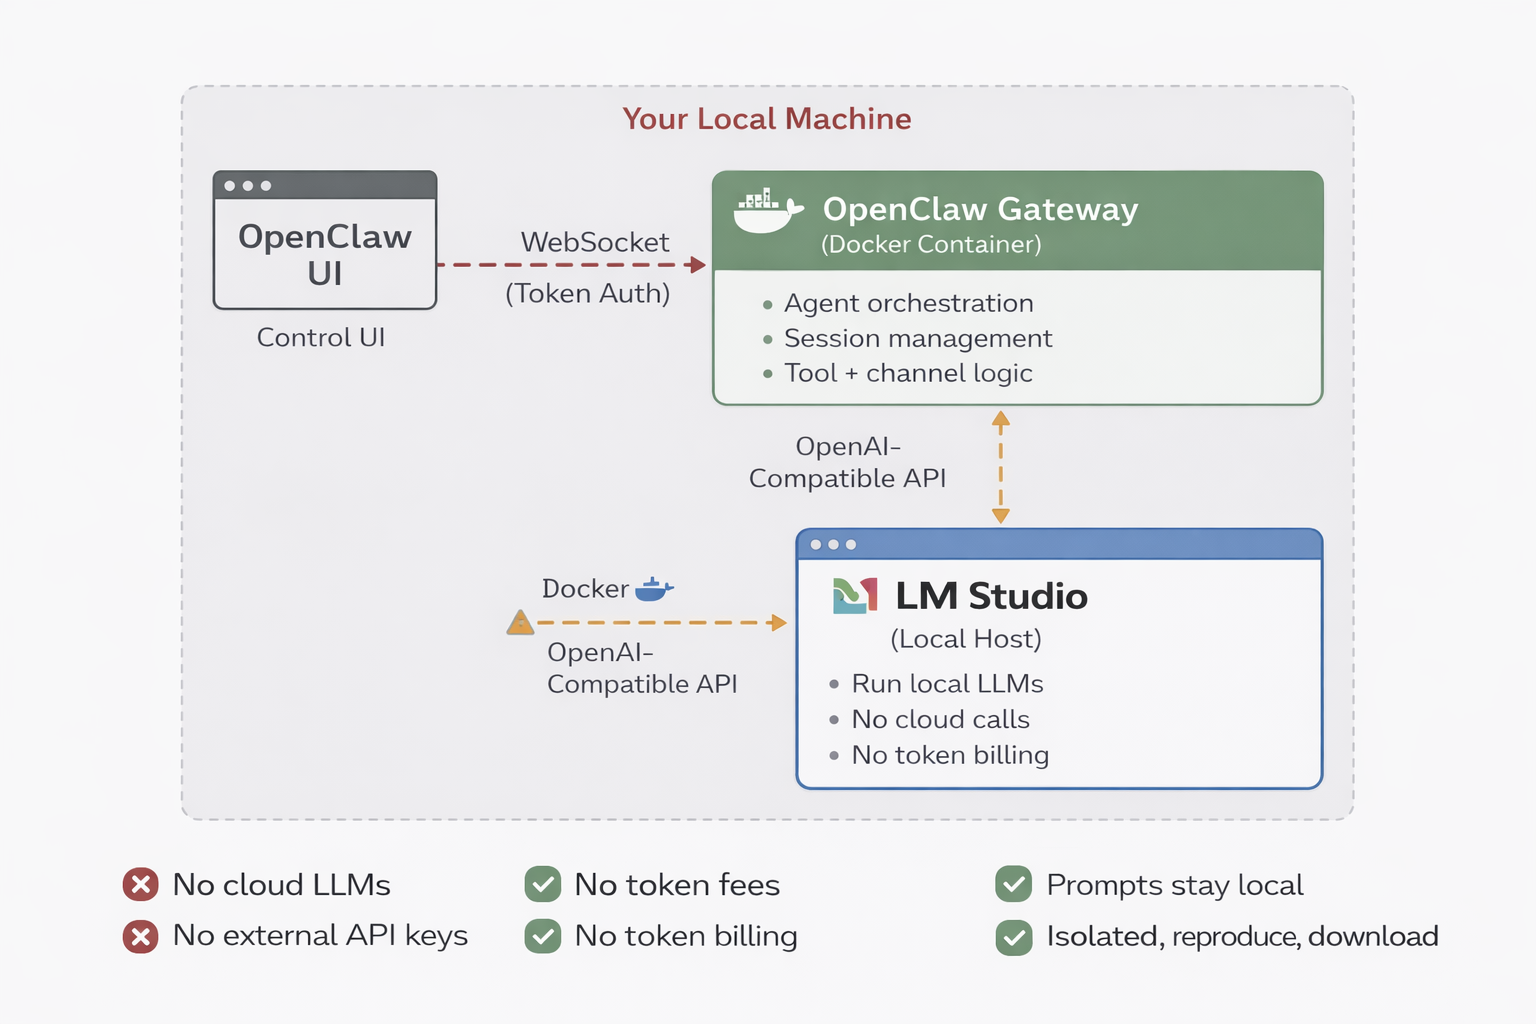
I wanted a way to run an AI agent framework locally without sending prompts, logs, or internal context to third-party APIs, and without racking up token costs. The result was a local setup using OpenClaw, Docker, and LM Studio.
This approach gives you a fully local AI gateway that is cheaper, more secure, and easier to control than cloud-based alternatives.
What I ended up with:
A local OpenClaw gateway running in Docker
A local LLM served by LM Studio
Zero per-token costs
Full control over models, context windows, and behavior
Below is how I set it up, why it works well, and a few roadblocks I hit along the way.
Why This Architecture Works
Security: All prompts, logs, and agent context stay on your machine. Nothing is sent to external providers, and there’s no vendor data retention risk.
Cost: Once the model is loaded, usage is effectively free. No API keys to rotate. No token bills.
Control: You choose the model, the context window, and how the agent behaves. Swapping models is a config change, not a migration.
Reproducibility: Docker keeps the gateway isolated and predictable. If it runs once, it’ll run again.
The stack looks like this:
OpenClaw for the agent framework and gateway
Docker and Docker Compose for isolation and lifecycle management
LM Studio for running local LLMs behind an OpenAI-compatible API
Prerequisites
Before starting, you’ll need:
Docker and Docker Compose installed
LM Studio installed locally
A machine capable of running a local model (GPU strongly recommended)
The OpenClaw repository cloned locally
Step 1: Install and Configure LM Studio
First, download and install LM Studio from lmstudio.ai.
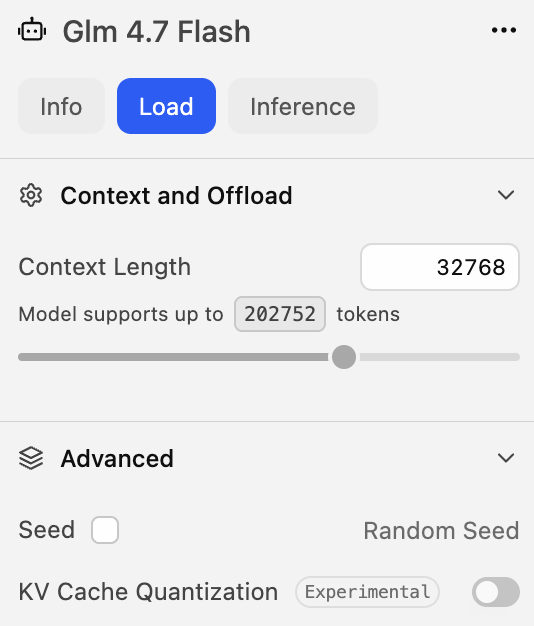
Once installed, load a non-reasoning model. This matters more than it sounds. Reasoning models tend to emit hidden chain-of-thought or verbose internal output, which can confuse agent frameworks.
What worked best for me:
It’s fast, clean, and produces straightforward responses that agents can reliably consume.
After loading the model:
Enable the OpenAI-compatible API in LM Studio
Use the default endpoint at http://localhost:1234/v1
If you run into context length errors later, increase the model’s context window in LM Studio. I eventually set mine to around 32k tokens.
Step 2: Verify LM Studio Is Working
Before involving OpenClaw, make sure LM Studio responds correctly.
From inside the OpenClaw Docker container, list available models. You should see your loaded model returned.
docker exec -it openclaw-openclaw-gateway-1 \
curl -s http://host.docker.internal:1234/v1/models
Then send a simple chat completion request asking the model to reply with a single word like “READY”.
docker exec -i openclaw-openclaw-gateway-1 \
curl -s http://host.docker.internal:1234/v1/chat/completions \
  -H "Content-Type: application/json" \
  -H "Authorization: Bearer lmstudio" \
  -d '{
    "model": "zai-org/glm-4.7-flash",
    "messages": [{"role":"user","content":"Reply with READY only."}],
    "temperature": 0
  }'
If the model responds exactly as expected, LM Studio is working correctly.
This step is important. If this fails, OpenClaw won’t magically fix it later.
Step 3: Configure OpenClaw to Use LM Studio
Next, configure OpenClaw to treat LM Studio as a model provider.
In the OpenClaw config file:
Set the provider base URL to http://host.docker.internal:1234/v1
Use the OpenAI chat API
Define the model ID exactly as LM Studio reports it
Explicitly set the context window and max tokens
Set the default agent model to the LM Studio model
The key detail here is using host.docker.internal instead of localhost. Docker containers can’t see the host’s localhost directly.
"models": {
    "providers": {
      "lmstudio": {
        "baseUrl": "http://host.docker.internal:1234/v1",
        "apiKey": "lmstudio",
        "api": "openai-completions",
        "models": [
          {
            "id": "zai-org/glm-4.7-flash",
            "name": "zai-org/glm-4.7-flash",
            "api": "openai-completions",
            "reasoning": false,
            "input": [
              "text"
            ],
            "cost": {
              "input": 0,
              "output": 0,
              "cacheRead": 0,
              "cacheWrite": 0
            },
            "contextWindow": 32768,
            "maxTokens": 4096
          }
        ]
      }
    }
  },
After updating the config, restart the OpenClaw gateway.
Step 4: Confirm OpenClaw Sees the Model
Once the gateway restarts, confirm OpenClaw recognizes the model.
Inside the container, list configured models. You should see your LM Studio model listed as available and local.
docker exec -it openclaw-openclaw-gateway-1 \
node dist/index.js models list
Gateway logs should also show which agent model is active. If the logs say OpenClaw is using your LM Studio model, the wiring is correct.
Step 5: Test Through the OpenClaw UI
Now test end-to-end through the OpenClaw dashboard.
Send a simple message like:
“Hello”
If everything is wired correctly, the response should return quickly and cleanly.
At this point, you’re running a fully local AI agent.

Roadblocks I Hit
A few things slowed me down:
Reasoning models produced unusable agent output
Small JSON syntax mistakes caused config reload failures
Context window limits in LM Studio caused silent failures
The CLI is powerful but very exact about flags
None of these were blockers, just sharp edges.
Why I’d Do This Again
This setup hits a really nice balance.
It’s secure: nothing leaves your machine.
It’s cheap: no usage-based billing.
It’s flexible: swap models, tune context, iterate fast.
It’s production-adjacent: Dockerized, observable, and controlled.
If you’re experimenting with agents, AppSec automation, internal copilots, or sensitive workflows, this is absolutely worth doing.